April 29, 2013

Crafts from the Past: Beauty Full Wood

Good morning friends. I hope you had a lovely weekend!

Today I've decided to share a bit of my home with you. Remember when I told you I wanted to hang bunting all over my house? I did it.


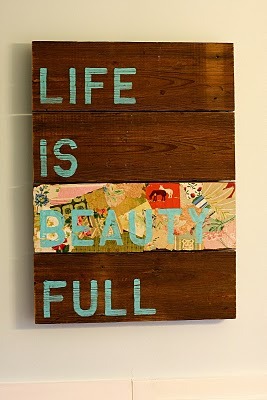
But that's not what this post is about... It's about that piece of wood hanging up there above the kitchen overhang. Let me tell you that I've had the worst time trying to figure out how to take a good photo of this piece of wood... In fact, I've been trying to share it with you for quite some time. This weekend, I was admiring its beauty, so I climbed up on our coffee table and snapped another pic. I suppose it will have to do... I hope you can see the richness and beauty of the wood.

Here's another attempt - sans decorations. I can't remember what I was standing on for this one. :) Can you see all the perfect imperfections?


It really is beauty full. And a complete accident.

It's actually supposed to be a shelf, probably collecting dust, in my dining room. A couple of years ago, I begged my hubby to hang a wood shelf in the dining room with some pretty iron brackets that I had found just for the project. You know, to look a little rustic, worn, and charming... Hubby agreed, because he is agreeable like that and off we went to hunt for the perfect piece of wood.

Luckily, my father-in-law is a carpenter and finding that perfect piece of wood just meant digging through the dusty garage converted into a workshop. During one of our fall visits the year before last, we went wood scavenging. I think the exact words I used to describe what I wanted was "an ugly piece of wood about this big (motioning with my hands)." I got a funny look, but the boys knew what I meant. Hehe. A few moments later, Hubby's father emerged with a beauty of a piece. It was knotty with some holey parts. I loved it! So we packed it in our car and drove our 8 hours home. Haha! I mean after the rest of our visit, of course...

The piece of wood sat against the wall for a while, because we are quite the procrastinators. Then one day, hubby gave me the sad news. The rustic, worn, and charming little shelf would not work out because the wall I picked did not have good studs for the shelf and the iron brackets and chunky wood were way too heavy and would likely end up falling on my dining room table and leaving a big dent. I don't know if I was more upset about the thought of gouging our dining room table or not having my little shelf.

But my hubby, who hates to see me sad chimed in, "Why don't you hang the wood anyway? I'm sure you can think of something to do with it" And then my brain whizzed through every lovely image I could think of involving wood hanging on a wall and I remembered this one:
This is totally and completely LoVeLy! :)

and so this project was born...

I used my Cricut to cut out the letters out of white vinyl and stuck them onto the wood. The letters for the word BEAUTY were cut out of some pretty scrapbook paper from my stash and glued onto the vinyl letters. 


Hubby got some frame hangers and pounded them into the back. Funny thing... Our walls are rather crooked, so the wood doesn't actually lay flush against the wall. But it works. And I love how it hangs on that wall up there above our kitchen counter. Pretty fabulous for a nearly free piece of one-of-a-kind art. 

April 28, 2013

Cupcake Inspirations Color Challenge


It sure has been a while since I played along with the Cupcake Inspirations Team. I've still been doing a lot of behind the scenes work, but I haven't had much time to craft with the Sweeties! Here I am today for a challenge I surely could not miss!


Here are the DEEtails for my card:
This week, we're playing a color challenge with Espresso, Chestnut, and Rose. Lovely! I interpreted the colors with Stampin' Up!'s Early Espresso, Soft Suede and Rose Red. Our generous sponsor this week is Stampotique and they sent me this lovely Garden and Wild Flowers Background Stamp. It looks like it could be a page out of a book, so I decided to really make it look like one! I started by tearing the edges, then crumpled the page up a bit. I smeared a little ink along the edges and a bit around the words, then sprayed a little Smooch Spritz. The sparkle is subtle and doesn't photograph well, but I love it. :) I added a layer of Early Espresso embossed with the wood grain folder underneath my "book page," then layered on my elements. First, part of a doily (actually recycled from my experimenting with the my bridal shower card), a die cut using the Labels Collection Framelit (my current go-to product) and some Soft Suede DSP (polka dots are my fave!). Then I added some Natural Trim Ribbon and frayed the ends for some texture. The Stippled Blossoms are the perfect touch, stamped in Early Espresso and VersaMark on Rose Red card stock, then heat embossed with some clear embossing powder. The sentiment is part of one from Oh, Hello, combined with a die cut "you" from Papertrey. What do you think?

Don't forget to hop over to Cupcake Inspirations to check out all the lovely cards that the rest of the Sweeties have created! Then make your own card using the color inspiration and link up! Can't wait to see what you create!

April 27, 2013

Naki and Nina's Double Dare Challenge 25


Hey there! Naki and I are back with another fun challenge. We hope you'll play along with us!

Naki's pick this week is to make a Mother's Day card
My pick was to use the This & That washi tape


Her's my card for the challenge:


Here are the DEEtails:

I love the gray diagonal stripes on the washi tape from SU!'s This & That series, and I decided to create a fun little background. I trimmed it down to size and rounded the corners. Then I layered it onto a doily from my stash. I pulled out this fun MOM stamp from the retired Messages for Mom set. I stamped it on some old Cameo Coral card stock. I decided to go with Cameo Coral because it's a little more pink that Calypso Coral. With my mom being a pink lover, it made sense to pick a more pinkish hue. The problem with picking this very old color is that I don't have much to go with it, so I dug around my stash and finally came up with this adorable doily print washi tape that I added to some Basic Gray card stock embossed with the honeycomb folder. A few hearts scattered on top and I was done.

Be sure to take a peek over at Naki's blog to see what she made for her mom! Then create your own Mother's Day card using some lovely This & That washi tape. Be sure to leave us a comment with a link to your card!

April 22, 2013

Wedding Wishes

Last week, we had a bridal shower for my friend Meredith, who is getting married in August. The lucky girl is going to Disneyland Paris for her honeymoon, so I picked something up for her when I was in Disneyland over Spring Break - a pair of bridal veil mouse ears!


I had a plan to trick the girl into thinking I bought her some lingerie, so I made this pretty card and wrote a note inside: "Here's a little something for you to wear on your Honeymoon..." She totally fell for it! She opened my card, thanked me, then quietly tucked the gift under her chair, embarrassed to open it! Haha! We finally coaxed her into opening it and she was pleasantly surprised to find the adorable mouse ears among all the tulle and tissue inside the shirt box. :)

Here are the DEEtails for my card:
I found the tutorial for this beautiful doily dress here which I followed for the skirt of the dress. The edge of the doily I used was perfect for the bodice, so I folded it over the center portion of the doily, which I gently trimmed along the doily edge. I adhered the pieces together and tied on some lovely Two-Tone ribbon. A Basic Gray base was perfect for this card with a simple sentiment from Love and Laughter. 

P.S. The beauty of this dress has a lot to do with the doily that you choose to use. I happen to have a small collection of paper doilies and tried these folds out on several different doilies before choosing this particular one. This specific doily is one that my mom got for me from a restaurant supply store and measures about 6 inches in diameter.

April 20, 2013

Naki and Nina's Double Dare Challenge 24


Naki and I haven't created a card together since February... What?!? Between the two of us, we've had birthdays, illness, and traveling, and we just haven't been in sync. And with all the craziness, we both kind of lost the inspiration to create. The two of us ordered some new goodies, got inspired and we're finally back on track now.

Naki's pick this week is to use the retiring Stampin' Up! Colors
My pick was to use the Sent With Love Stamp Set


I'm gonna tell you that this was a tough challenge... The Sent With Love set is fabulous, but it's so hard to create something without using all the adorable coordinating DSP and colors! And although I'm sad to lose the retiring SU! colors, I had a difficult time creating a combo with them that I loved right away. My card eventually evolved into this...


Here are the DEEtails:

I started with a Not Quite Navy base and layered some Pretty in Pink DSP and Regal Rose card stock, trimmed with my pinking shears. I wrapped some Whisper White Baker's Twine around it added my embellishments.  I created a little ticket using a sentiment from Sent With Love and an image from That's the Ticket, punched out with the coordinating ticket punch. Then I punched a heart out of River Rock card stock and ran it through my crimper for some texture. I stamped arrow from Sent With Love and cut it out to finish things off. I still feel like it needs a little something, but it's just not coming to me... Any thoughts?

Don't forget to check out Naki's creation over on her blog. Then make your own card using our Double Dare picks and leave us a comment with a link to your card!

April 18, 2013

Pals Paper Arts Sketch Challenge


What a fun sketch we have for you this week over at Pals Paper Arts! Here's what Margaret has made for us this week:
And now for the card DEEtails:

This card is all about layers! I started with the Vine Street embossing plate, layered onto some Pool Party card stock. Then I die cut a framed base using the label collection and oval collection framelits, with Basic Gray card stock and some Basic Gray DSP. I adhered it with some Stampin' Dimensionals over some Two Tone Ribbon. I layered some butterflies, using the new This & That DSP and Pool Party card stock and added a few Rhinestone Jewels.  Then I added my last layer, the sentiment from Sweet Essentials onto my card.

I can't wait to see what you do with this sketch! Be sure to hop over to PPA to see what the rest of our Resident Artists have created and link up your creation. See you there!

April 14, 2013

Refreshed and Renewed

Well, hello there! I've missed you! I don't mean to be a stranger, but it has been a couple of rough months! I'm finally feeling refreshed and renewed and trying to get back into the swing of things. Things started out just being busy and crazy. Then it got even busier and even crazier. Then I got sick and just couldn't get better. Yuck!

Once April rolled around, I finally got a break. Spring Break, that is. And it turns out that a little sunshine and fresh air was just what I needed!


My dad traveled here from Japan and we took a mini vacation to San Diego. We didn't actually spend much time at the beach. We had lunch one day right by the water and stepped out on the sand for a few minutes to snap some quick photos. I took these on my iPhone. I love that I can whip it out and take crisp, clear photos  in a jiffy.


Have you been to the Flower Fields in Carlsbad? I haven't, but I have done some mad shopping at the outlet mall right below. The view is breathtaking! And the shopping isn't too shabby either.


Anyway, I'll leave you for now... Just wanted to let you know that I am alive and well and will return soon with projects to share!