


Today I've decided to share a bit of my home with you. Remember when I told you I wanted to hang bunting all over my house? I did it.

But that's not what this post is about... It's about that piece of wood hanging up there above the kitchen overhang. Let me tell you that I've had the worst time trying to figure out how to take a good photo of this piece of wood... In fact, I've been trying to share it with you for quite some time. This weekend, I was admiring its beauty, so I climbed up on our coffee table and snapped another pic. I suppose it will have to do... I hope you can see the richness and beauty of the wood.
Here's another attempt - sans decorations. I can't remember what I was standing on for this one. :) Can you see all the perfect imperfections?

It really is beauty full. And a complete accident.
It's actually supposed to be a shelf, probably collecting dust, in my dining room. A couple of years ago, I begged my hubby to hang a wood shelf in the dining room with some pretty iron brackets that I had found just for the project. You know, to look a little rustic, worn, and charming... Hubby agreed, because he is agreeable like that and off we went to hunt for the perfect piece of wood.
Luckily, my father-in-law is a carpenter and finding that perfect piece of wood just meant digging through the dusty garage converted into a workshop. During one of our fall visits the year before last, we went wood scavenging. I think the exact words I used to describe what I wanted was "an ugly piece of wood about this big (motioning with my hands)." I got a funny look, but the boys knew what I meant. Hehe. A few moments later, Hubby's father emerged with a beauty of a piece. It was knotty with some holey parts. I loved it! So we packed it in our car and drove our 8 hours home. Haha! I mean after the rest of our visit, of course...
The piece of wood sat against the wall for a while, because we are quite the procrastinators. Then one day, hubby gave me the sad news. The rustic, worn, and charming little shelf would not work out because the wall I picked did not have good studs for the shelf and the iron brackets and chunky wood were way too heavy and would likely end up falling on my dining room table and leaving a big dent. I don't know if I was more upset about the thought of gouging our dining room table or not having my little shelf.
But my hubby, who hates to see me sad chimed in, "Why don't you hang the wood anyway? I'm sure you can think of something to do with it" And then my brain whizzed through every lovely image I could think of involving wood hanging on a wall and I remembered this one:
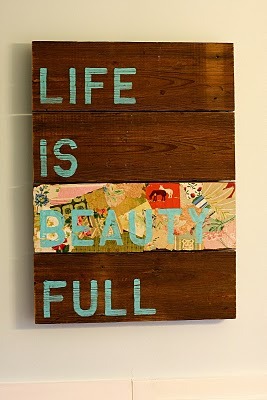
and so this project was born...
I used my Cricut to cut out the letters out of white vinyl and stuck them onto the wood. The letters for the word BEAUTY were cut out of some pretty scrapbook paper from my stash and glued onto the vinyl letters.
I used my Cricut to cut out the letters out of white vinyl and stuck them onto the wood. The letters for the word BEAUTY were cut out of some pretty scrapbook paper from my stash and glued onto the vinyl letters.

Hubby got some frame hangers and pounded them into the back. Funny thing... Our walls are rather crooked, so the wood doesn't actually lay flush against the wall. But it works. And I love how it hangs on that wall up there above our kitchen counter. Pretty fabulous for a nearly free piece of one-of-a-kind art.


